Manage event galleries and photo access
How do admins create an event album and choose its audience?#
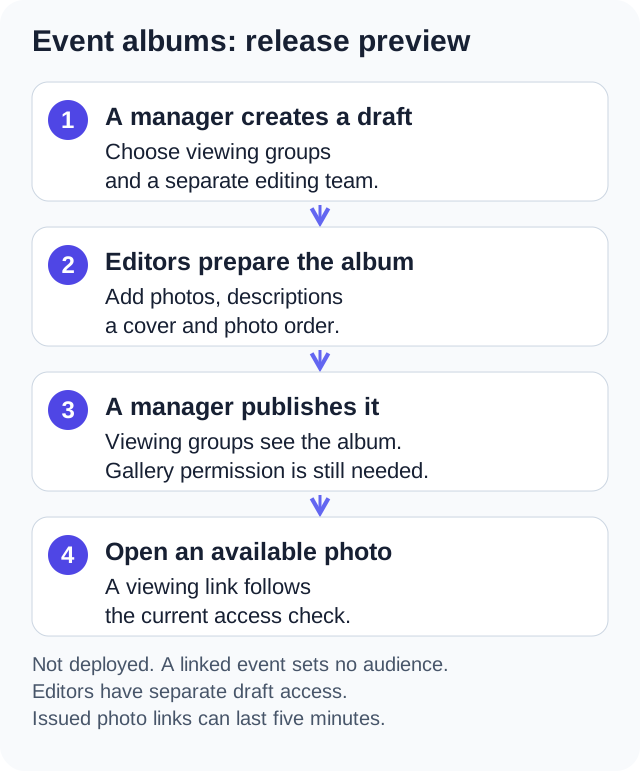
In the Event gallery release preview, owners and admins with Manage Event Gallery can create albums, choose viewers and editors separately, upload photos, and publish the album when ready. Assigned member editors can prepare content without becoming admins. The preview is not deployed, and album access does not inherit the linked event's audience.
Requirements#
The "Event gallery (albums & photos)" feature must be enabled in Settings > Features. Owners and admins with Manage Event Gallery can create albums, change access, publish, return albums to draft, and delete albums. An ordinary member can edit an existing album when assigned through an editor group or as an individual editor; that member still needs View Event Gallery.
Choose who views and who edits#
| Access | What the person can do |
|---|---|
| Owner or admin with Manage Event Gallery | Create and manage every album, including its viewers, editors, publication, and deletion. |
| Assigned editor group or individual editor | View the assigned album even in draft, change its title and description, upload and remove photos, edit captions and alternative text, choose a cover, and reorder photos. |
| Viewing group member | View a published album and its photos. Membership in any selected viewing group qualifies. |
| All members, when no viewing groups are selected | View the published album if their account has gallery access. |
A viewing grant does not allow editing. An editing grant allows viewing the assigned album even when the editor is outside its viewing groups. Leaving editors empty grants no additional editors; owners and permitted admins retain control.
The Gallery feature switch applies to everyone. The View Event Gallery member permission still applies to assigned member editors. See roles and permissions to change those controls.
Create an album#
- Open "Event gallery" from the home screen or Admin Panel drawer.
- Press "Create album".
- Enter "Album title" (up to 200 characters) and an optional "Description" (up to 5,000 characters).
- Choose "Linked event", or leave "No linked event" selected. You can also open an event in the Calendar and choose "View event gallery" to create an album with that event already selected.
- Under "Who can view", tick the "Viewing groups" that should see the published album. Leave every group unticked only when all members with gallery access should be able to view it.
- Under "Who can edit", choose "Editing groups" and "Individual editors".
- Leave "Published" off to prepare a draft, or turn it on to share with the viewing audience immediately.
- Press "Save album".
To change the album settings later, open the album and press "Edit album". Only owners and admins with Manage Event Gallery can change the event link, publication, viewers, and editors.
Check the audience: An album does not inherit permissions from its linked calendar event. If both should be limited to the same committee, choose that audience on both. Viewers do not gain permission to see the calendar event by receiving access to its album.
Removed groups and unavailable editors#
If a group is deleted or an editor is no longer active, the saved selection can appear as "Unavailable group" or "Unavailable member". Clear that selection to remove its access, choose a replacement if needed, and press "Save album". A deleted viewing group does not automatically open the album to everyone.
Clearing the last viewing group changes the published album to all members with gallery access. The app asks "Allow all members to view?". Confirm with "Allow all members". Choose a replacement viewing group first if the album should stay restricted.
Upload photos#
- Open an album you can edit and press "Add photos".
- Choose "Choose photos" to select up to 100 files from your device.
- Wait for the progress bar and the result message. Keep the album open while the upload is running.
To use an existing image URL instead, choose "Add from a link", enter the "URL" in "Add a photo from a link", and press "Fetch". Use a link to the photo file itself. If the link requires sign-in or its website blocks loading in the browser, download the image first and use "Choose photos".
Supported formats are JPEG, PNG, WebP, and GIF, up to 20 MB per photo. Each album holds up to 1,000 photos. Videos, SVG, and HEIC files are not accepted; export a supported image file before uploading.
A photo upload batch can partly succeed. The result dialog lists files that were not added and the reason for each. Select only those files again to retry; photos that succeeded are already in the album.
Photos count against the same organization storage allowance as documents. An upload that would exceed the plan cap is refused. See usage limits before adding a large album.
Captions, alternative text, cover, and order#
- Open "Photo options" on a photo and choose "Edit caption and description".
- Enter "Caption" for words members see with the photo, up to 2,000 characters.
- Enter "Image description", up to 1,000 characters, to describe the image for a screen reader. Explain what the photo shows; a filename like IMG_1023 does not give that context.
- Press "Save photo".
To choose the album cover, open that photo's "Photo options" and choose "Set as cover". The selected photo shows the "Album cover" marker.
When the album has at least two photos, press "Reorder photos". Use "Move photo up" and "Move photo down", or "Drag to reorder", then press "Save order". "Cancel" leaves the saved order alone.
Album title, description and photo edits apply to the existing album, so a published album reflects them as they are saved.
Publish or return to draft#
Only owners and admins with Manage Event Gallery control publication. Open "Edit album", turn "Published" on or off, and press "Save album".
Publishing an album makes the album available to the album's viewing audience. Turning Published off returns the album to draft, hiding the album from ordinary viewers while keeping the album available to assigned editors and gallery managers.
Editors can change a published album's content without changing its publication setting. If you want to review edits before viewers see them, return the album to draft first.
Remove a photo or album#
To remove one photo, open its "Photo options", choose "Delete photo", and confirm "Delete photo". Deleting the photo permanently removes it from the album and releases its counted storage.
To remove the whole album, press "Delete album" in the album toolbar and confirm "Delete album". All of the album's photos are permanently removed from the portal. Save anything you need first; there is no restore action. "Cancel" keeps the photo or album.
Photo or album deletion removes portal access immediately. Stored file cleanup runs in the background and retries failures. A photo link already issued can still work until its five-minute expiry.
Deleting the linked calendar event only removes the association. The album and its photos remain. Turning Gallery off also keeps the gallery data; turn it back on to make permitted access available again.
Changes to access and photo links#
Access checks use current permissions and group memberships. Removing an editor or changing viewing groups affects new requests. Photos use short-lived private viewing links; a link already issued may remain usable for up to five minutes after access is removed. A copy someone has already downloaded is outside the portal's access controls.
Common mistakes#
- Leaving viewing groups empty when an album should be restricted. Empty means all members with gallery access once published.
- Adding someone as an editor when they should only view. Editors can change the album and remove photos.
- Expecting the linked event to supply the album's audience. Set both audiences.
- Editing a published album while expecting a private review stage. Return it to draft before changes that should stay with the editing team.
- Retrying a whole photo batch without checking which uploads succeeded.
WCAG 2.2 success criterion 1.1.1 says non-text content should have a text alternative that serves the equivalent purpose, which is the job of "Image description". If your iPhone captures photos in the space-saving HEIF format, Apple's guide to HEIF and HEVC media shows how to open Settings, tap Camera, then Formats, then Most Compatible so new photos use JPEG. Those references explain an accessibility guideline and a camera setting; they do not change the gallery's own format or size limits.
FAQ#
Can I let a committee edit without making everyone an admin?#
Yes. Choose the committee's group as an editor group for the album. The committee members still need View Event Gallery. Committee editors can prepare the album but cannot change access, publication, or delete the whole album.
Can viewers and editors be different groups?#
Yes. For example, share a published album with all members while assigning a small photo committee as editors. Editors can see the draft before everyone else.
Does deleting a calendar event delete its gallery?#
No. The calendar association is removed while the album and photos stay in Event gallery.
Published: . Last updated: .